Pages

Wednesday, December 20, 2017

Making A Robot

For the last couple of months I've been working on a robot.
I started with the body:

The body & wheel modules
The body is basically just four wheels connected by popsicle sticks. It doesn't sound like it would be very strong, but it managed quite a large load, as the following video demonstrates.

For this setup I just directly connected the wheels
to a crude semi-remote control with a couple of wires.

I decided to use my Arduino for the brains of my robot, but it turns out using an Arduino to power motors is harder then I thought.
After some research, I decided I needed a couple of 'H-bridges', which are basically a couple of switches wired together to form a motor controller. After a month or so, I actually went out to buy them.
What I ended up getting was actually a 'shield' for my Arduino (it plugs in the top), which is better then an H-bridge because it can run a lot more motors, and be controlled directly by the Arduino. All in all, it should be a lot easier to figure out, and work better.

Or so I thought.
Before I started playing with it, I decided to research how to use it (logically, I think). And after half an hour or so I had found... nothing.
Well, nothing very useful at least. After a while more of researching, tweaking and coding I came up with this:


The pink and blue wires lead to the motor. 

I know, not remarkable. And it didn't even work.

After a couple days of sulking (OK fine, not only sulking), I decided to try again.
This time, instead of trying to write my own code for it, I copied someone else's. It still didn't work. Then I decided to check the polarity of the power source wires (these provide the power for the motors).

This is embarrassing. The polarity was backwards. 😬 After switching those wires around, the motor ran fine! FINALLY!!!

Now that I had the shield working, I programed it to drive my robot. This was pretty easy, since all I needed to do was test out the system. I made a program that made it drive in circles.

Then I connected the Arduino and motor shield to my robot, made a simple power supply circuit, and started driving.
Here is the robot in it's current state:


Next Steps:
  1. Find battery and charger for robot and install battery into robot
  2. Find and attach some sensors
  3. Make a program to run the robot with the sensors
  4. Possibly at a Raspberry Pi and use it to run a neural network
Time spent (approximately): 7 hours

Thursday, December 14, 2017

BREAKING: Secret Government Nose Chips make Waves in Southern Alberta

Albertans are in shock after a recent scientific article is exposed, showing that their government secretly embeds computer chips in their nose skin. Famous scientific columnist John Douglas (Joint writer of the controversial article Why hair: How to Shave) says: "I cried for three hours, after I read that article. My privacy was violated." "After that, I went to my bathroom and tried to take out the chip with tweezers, but I failed."
This is an example selected from many other similar complaints from upset people across the Provence.

Monday, November 20, 2017

Making a New Knife Handle

A few months ago my knife melted. Well, the handle did at least. 
I managed to get the blade out of the plasticy mess, but it’s hard to use a knife without a handle. 
I figured I’d make a new one, but it looked hard- it was the flip-in blade type of knife, so there wasn’t much 
of the blade to attach a new handle to. There was a hole in the end of the blade, which could be used to 
attach a new handle, but it had a bolt in it. So I got a new knife.

I recently found that lonely blade, and I realized I could just cut off the bolt thing (I’m not sure why I didn’t 
do this before). So I did, and then I made a new handle for it.


Steps to Making a Knife Handle:
  1. Get all the extra stuff off the blade (ie. the bolt that used to hold it to the original handle
  2. Find to thin pieces of wood to use for the main structure of the handle
  3. Drill a hole in the end for the bolt holding in the blade
  4. Attach the long metal piece on the back to also hold the blade
  5. Measure and then cut the wood to roughly the right shape and size
  6. Screw all the bits and pieces together
  7. Add more thin wood in the middle and then glue
  8. Sand


Here are some pictures of the process: (I didn’t get pictures of the first steps)

Tuesday, April 25, 2017

Electrolysis Experiment

Electrolysis Experiment!

I did an experiment for science class about making hydrogen using electrolysis.
Here are some photos and a video of the results!

See the full experiment here.

Salt water and foam in the electrolyser

Hydrogen filled foam

A bunch of hydrogen filled soap bubbles

A video of the exploding bubbles
A bubble exploding (yellow flame)

Friday, March 10, 2017

Hexagonal microcircuitry

Most conventional circuit chips are made with a square grid, but maybe it would be a better idea to use a hexagonal grid, which has more vertexes per area. This might make them more space efficient, but it might also not.

Just saying.

Wait, there could be one use-like thing...

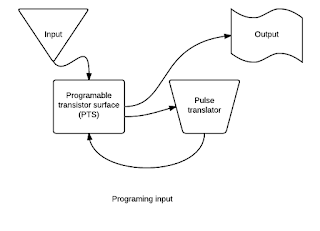
If you connected a gray scale camera to a programmable transistor surface you could use it to make connections within the computer using photos to program the PTS. I don't know how this could be useful, but it's an interesting way to directly program computers with pictures.

Self programming transistor surfaces

OK here it is: (I don't actually expect anyone to understand it, since I was just writing down everything I'm thinking, I just put it on this blog for me to remember and other people to see what I was doing)

I was thinking about variably conductive programmable surfaces. Basically it would be a surface which changes its conductivity based on what electricity is going in to the parts of it. people could make circuits that program themselves based on inputs, and then program themselves differently when the inputs are processed, then reprogram themselves again, as many times as necessary. I don't actually know how useful it would be, or how it could reprogram itself, since to program itself it would have to have more outputs then inputs, and since it's a plane with a 1D outside with outputs and a 2D inside with the outputs, this seems impossible, unless the inputs and outputs are switched somehow,  but I don't know how that would work. It may be a good way to process pictures, or somehow draw physical circuits.

There is a way! I realized how the output could connect to the inputs- they could use binary pulses which a conventional chip could recognize and translate the pulses into direct non binary signals which could be used as the input to program the chip and make a new program.


Tuesday, February 7, 2017

Minecraft wizard house

 I made a magic-themed wizard family house in Minecraft. Fortunately, I took some screen shots of it. Here they are, along with some history.
The house and land of a powerful wizard and his family.

The wizard's hovering workshop


The wizard made all the buildings by magic.

Regrettably, the wizard didn't have magical measuring tapes, so the building are rather wonky.

The wizard often retreats to his hovering workshop. No one really understands what he does in it, but observers often experience large bangs and explosions.


Friday, February 3, 2017

Omni/multiderectional reflectors

https://en.wikipedia.org/wiki/Cat's_eye_(road)

Cat's eye reflectors are used on roads and places where light needs to be reflected directly back where it came from.

These only reflect light back in a
 very limited amout of derections.
I looked it up, and I didn't find any reflectors that reflect back in all directions, but I did design one myself. Here it is:
Grey=Mirror Light blue=Glass Blue=Light

As the light enters the glass it gets diffracted. This points it directly at the mirror, which reflects it back out the glass, which diffracts it again, and the light goes back to where it came from. If you where to look in this mirror ball, it would probably look black, because it would be reflecting your eye.


Friday, January 27, 2017

Wednesday, January 25, 2017

Curves

I made curves using different number sequences. Normal, Fibonacci, odd, and triangular. I used a pixel art drawing program.


Sunday, January 22, 2017

Optical computing

Photonics:
http://news.berkeley.edu/2015/12/23/electronic-photonic-microprocessor-chip/

http://www.nextbigfuture.com/2008/01/3d-waveguide-is-promising-for-optical.html

https://en.wikipedia.org/wiki/Optical_computing

Summary:
Photonics is a way to make computers using light instead of electricity. According to some scientists, it could be many times faster then traditional electronics. The basic component of photonics is, like electronics, the optical transistor, which is used to make optical logic gates, which are combined to make optical chips.

I think that it's a cool idea, and I wonder if it would be possible to use sunlight to power an optical computer. If it is, then we could have computers that never need recharging, which would be perfect for people in developing countries and remote places.

I also wonder if it would be possible to make an optical battery.

Wednesday, January 4, 2017

How opals are mined in Australia

The miners begin by drilling a hole into the ground, until they reach the depth most common for opals. They descend into the shaft, then break away at the rock, using tools such as pickaxes and hand drills, until they find rock with a greenish tinge. This is a sign of opals. They break the rock apart, checking every chip for a hint of opal.

Source:https://www.youtube.com/watch?v=zHecdSDz4uU

Tuesday, January 3, 2017

Airship research

Airship research

http://www.treehugger.com/aviation/check-out-the-aeolus-airship-human-powered-blimp-can-stay-aloft-for-two-weeks.html

http://worldbuilding.stackexchange.com/questions/8485/how-could-a-sail-powered-airship-work

https://www.quora.com/Could-airships-sail-like-sea-going-sailing-ships

 http://newatlas.com/zeppy3-sail-balloon-mediterranean-crossing-attempt/15552/

Super black paint

 http://newatlas.com/vantablack-s-vis-spray/42298/?li_source=LI&li_medium=default-widget